Use the tabs on this page to select the status events and reasons that may be associated with each employment status and the payroll processes that are allowable for each combination of status and event.
This setup will accelerate the process of selecting an event for an employment status and eliminate the potential to select an event that would not associate logically with a status—for example, selecting New Hire as the event precipitating an employment status change to Retired.
It also will ensure that employment statuses and payroll processes are linked appropriately, as in the following scenarios:
- An employee on short-term disability leave should continue to appear in the payroll and incur accruals, while one on long-term disability leave should not.
- Benefit open enrollment needs to include employee's on leave who still select and receive benefits.
- Payroll should exclude terminated employees but include employees who are on leave with pay.
- Employees who fall within certain statuses should not receive accruals.

The grid on this tab contains all groupings of statuses, status events and payroll processes. Each row corresponds to a grouping.
-
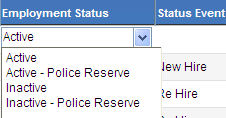
In the blank row at the bottom of the grid, to select from a list of available statuses or status events, click in the appropriate cell to enable it and display the prompt button, and click the prompt button.
 Show me.
-
For each combination of status and event, check each payroll process that will be allowable.Show me.

As a result, employees with each status or combination of status and event will be included automatically in the payroll processes you check; for example, if you were to check Retro Pay for a Status of Leave and Status Event of Short-Term Disability, any employee with that combination of status and event would receive retro pay.
Note: Each combination of Status and Status Event must be unique.
You may associate payroll processes with statuses that are not associated with status events.
Each time you <Tab> out of a row, the selections will be saved.
- To save your selections, click Save.
Note: A combination of status and event that has been used in the system may not be edited or deleted.
- To edit an Employment Status or Status Event, click directly in the appropriate cell to enable it.
- Click the prompt button. A drop-down of valid entries will display.
- Select the entry.
- To check or uncheck a payroll process, click directly in the corresponding check box.
- To save your edits, click Save.
Note: A combination of status and event that has been used in the system may not be edited or deleted.
Click the delete icon ![]() , located in the cell immediately to the left of Employment Status. A pop-up will ask for confirmation of the delete.
, located in the cell immediately to the left of Employment Status. A pop-up will ask for confirmation of the delete.
If you need to create a new Employment Status or Status Event or change its description without leaving the page, hold down the <Ctrl> key, and click in the appropriate cell. The Validation Set Values page will open in a separate window. You may add and save the new status or event from there, and it will be added to the appropriate drop-down on the Status Events Maintenance page.
To generate a listing of all the data in this grid, hover over the Export button located in the bottom border of the grid. A drop-down menu will open, giving you the options to export data to PDF, Excel and XPS formats. Click the format you want. If selections in the grid have been modified, the Export button will be disabled until the selections are saved.
The bottom border of the grid contains a series of buttons. To see what a button does, click its image below:

Use this tab to define the reasons that may be associated with various employment status events.
The grid on this tab contains all status events and all combinations of status events and event reasons. Each row corresponds to status event or a combination of status event and event reason.
Although the association of event reasons with employment status events is optional, doing so will accelerate the process of selecting a reason for an employment event and eliminate the potential to select a reason that would not associate logically with an event—for example, selecting Birth of a Child as the reason for an employment event of New Hire.
Note: Each combination of Status Event and Event Reason must be unique.
- Click in the Event Reason cell adjacent to the Employment Status Event to enable the cell and display the prompt button.
-
Click the prompt button to display a drop-down of valid event reasons.Show me.
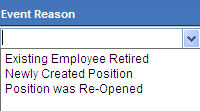
- Click the Event Reason to populate the cell with it.
- To make the combination active, check the corresponding check box in the Active column.
- Click the Save button located in the bottom border of the grid.
Note: If you are filling in the last row of the grid, a new blank row will be inserted at the bottom when you click Save.
Note: A combination of Event Reason and Employment Status Event that has been used in the system may not be edited or deleted.
- Click directly in the appropriate cell to enable it.
- Click the prompt button. A drop-down of valid entries will display.
- Select the entry.
- To check or uncheck Active status, click directly in the corresponding check box.
- To save your edits, click Save.
To save the selections you have added or edited, click the Save button.
If you need to create a new Event Reason or change its description without leaving the page, hold down the <Ctrl> key, and click in the appropriate cell. The Validation Set Values page will open in a separate window. You may add and save the new status event or event reason from there, and it will be added to the appropriate drop-down on the Employment Status Events Maintenance page.
To generate a listing of all the data in this grid, hover over the Export button located in the bottom border of the grid. A drop-down menu will open, giving you the options to export data to PDF, Excel and XPS formats. Click the format you want. If selections in the grid have been modified, the Export button will be disabled until the selections are saved.
The bottom border of the grid contains a series of buttons. To see what a button does, click its image below:
To assign user rights to Employment Status Events Maintenance security, follow these steps:
- Navigate to Maintenance > new world ERP Suite > Security > Users. The User List page will open.
- Select (highlight) the user who will be given rights to accrual processing.
- Click Permissions. The Permissions page for the selected user will open, showing a grid of application components.
- Click the Show Search link in the top-right corner of the page. The Component Name, Application and Company Name search fields will display.
- In the Component Name field, type Employee Status Events Maintenance.
- Select the Human Resources Application.
- Click Search. The grid will refresh to show only the Employment Status Events Maintenancecomponent.
- Check the appropriate processes to which the user will be assigned.
- Click Save.
- For the authorization to take effect, the user will need to sign off and sign on the system.